

Introduction
In today’s rapidly evolving digital landscape, incorporating artificial intelligence (AI) capabilities into applications has become crucial. One such powerful integration is the combination of ChatGPT, an advanced language model, with Power Apps Canvas app. This integration allows you to enhance user interactions and provide intelligent responses. In this comprehensive guide, we will walk you through the step-by-step process of integrating ChatGPT into your Power Apps Canvas app, empowering you to create dynamic and engaging user experiences.
Table of Contents
Overview of ChatGPT and Power Apps
Introduction to ChatGPT and its Capabilities
- Understanding the capabilities of ChatGPT, a powerful language model developed by OpenAI.
- Exploring its natural language processing (NLP) and generation capabilities.
- Discussing the potential benefits of integrating ChatGPT into Power Apps.
Introduction to Power Apps and its Benefits
- Overview of Power Apps, a low-code development platform by Microsoft.
- Highlighting the advantages of using Power Apps for building custom business applications.
- Exploring the flexibility and scalability of Power Apps for various use cases.
By providing an in-depth overview of ChatGPT and Power Apps, you will gain a better understanding of their individual strengths and how they can be integrated to enhance app experiences.
Setting up ChatGPT Account and Obtaining API Key
In order to integrate ChatGPT into your Power Apps Canvas app, you need to set up a ChatGPT account and obtain an API key. Follow these steps to get started:
Creating a ChatGPT Account:
- Visit the ChatGPT website and sign up for an account.
- Provide the required information to create your account.
- Verify your email address to activate your account.
Obtaining an API Key:
- Once you have created your ChatGPT account and logged in, navigate to the API section.
- Generate an API key specifically for your Power Apps integration.
- Copy the generated API key, as you will need it to authenticate and access the ChatGPT services.
Securing your API Key:
- Ensure that you keep your API key confidential and do not share it publicly.
- It is recommended to store the API key in a secure location, such as a key vault or encrypted configuration file.
- Take necessary precautions to protect your API key from unauthorized access or misuse.
By setting up a ChatGPT account and obtaining an API key, you are ready to connect your Power Apps Canvas app with the ChatGPT services. This allows you to leverage the powerful language model and provide intelligent responses to user queries within your app.
Remember to follow the ChatGPT terms of service and any usage limits to ensure a smooth and compliant integration.
Creating a Canvas App in Power Apps
When integrating ChatGPT into a Power Apps Canvas app, the first step is to create the app itself. Power Apps provides a user-friendly environment for designing and building custom applications without the need for extensive coding knowledge. Here are the key steps involved in creating a Canvas app in Power Apps:
Setting up Power Apps environment:
- Access the Power Apps platform and log in with your Microsoft account.
- Create a new app from scratch or choose a template to get started.
Designing the user interface with appropriate controls:
- Use the Power Apps canvas to design the layout of your app’s screens.
- Drag and drop various controls onto the canvas, such as buttons, text inputs, and labels, to create the desired user interface.
- Customize the appearance and behavior of each control according to your app’s requirements.
Configuring data sources and connections:
- Connect your app to the relevant data sources, such as SharePoint, SQL Server, or Microsoft Dataverse.
- Configure the data connections and establish the necessary permissions to interact with the data.
- Define the data fields that will be used in the app and specify any required validations or formulas.
Implementing app logic and functionality:
- Use Power Apps formulas and expressions to add logic and functionality to your app.
- Define actions and behaviors for various events, such as button clicks or data changes.
- Incorporate formulas to perform calculations, apply filters, or navigate between screens.
Testing and refining the app:
- Preview the app to ensure that the user interface and functionality work as intended.
- Test the app on different devices and screen sizes to ensure responsiveness.
- Collect feedback from users and make any necessary refinements or improvements.
By following these steps, you can create a customized Canvas app in Power Apps that serves as the foundation for integrating ChatGPT and delivering an enhanced user experience.
Remember to optimize your app’s performance and usability by keeping the design simple and intuitive. Use descriptive names and labels for controls and elements, and provide clear instructions to guide users through the app. With a well-designed Canvas app in place, you are ready to proceed with the integration of ChatGPT in the subsequent steps.
Configuring Power Automate Flow
To seamlessly integrate ChatGPT into your Power Apps Canvas app, you need to configure a Power Automate flow. This flow will serve as the bridge between your app and the ChatGPT API, allowing for communication and processing of user queries. Here are the key steps involved in configuring the Power Automate flow:
Creating a New Power Automate Flow:
- Access the Power Automate platform.
- Click on “Create” to start a new flow.
- Select the appropriate trigger, such as “Power Apps – When a button is clicked.”
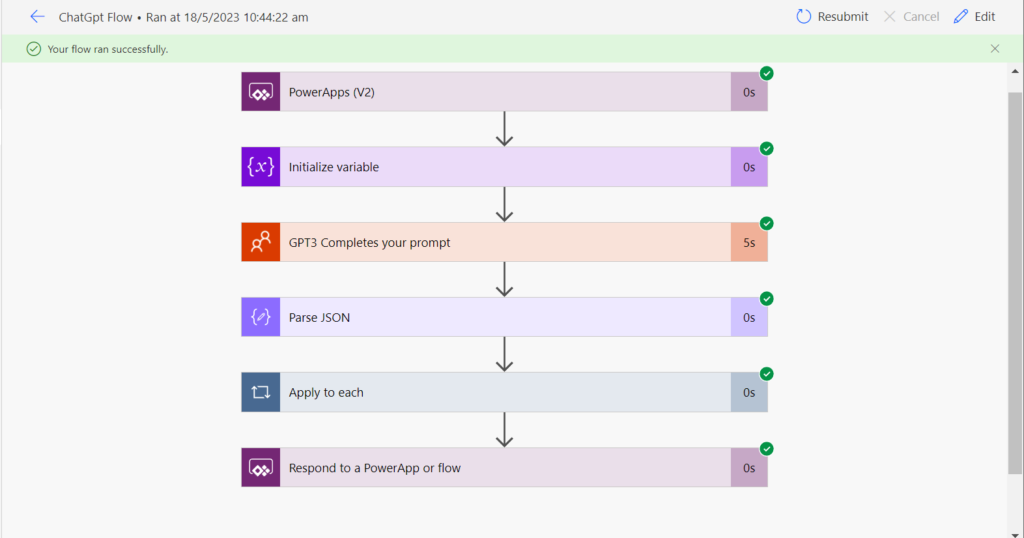
Adding the “GPT3 Completes your prompt” Connector:
- Within the flow, search for and add the “GPT3 Completes your prompt” connector.
- Authenticate the connector using your ChatGPT API key.
Configuring the Connector:
- Specify the necessary inputs for the ChatGPT connector, such as the prompt and the API key.
- Set any additional parameters or options based on your requirements.
Customizing the Flow Logic:
- Add any additional actions or conditions to process the response from ChatGPT.
- Apply business logic to customize or manipulate the response as needed.
Testing and Debugging:
- Save the flow and test it using sample data or real user inputs.
- Review the outputs and ensure the flow is functioning correctly.
- Debug any issues that arise and refine the flow as necessary.
Publish and Connect to Power Apps:
- Once the flow is configured and tested, save and publish it.
- Return to your Power Apps Canvas app and connect the flow to the appropriate trigger or event.
- Configure any input/output parameters between the app and the flow.
By following these steps, you can successfully configure the Power Automate flow to enable communication between your Power Apps Canvas app and the ChatGPT API. This integration allows for seamless data transfer and intelligent responses to user queries within your app, enhancing the overall user experience.
Know more about Power Automate
Triggering the Power Automate Flow from the Canvas App
To enable seamless interaction between the Canvas app and the Power Automate flow, you need to configure a trigger action in Power Apps that initiates the flow when the user interacts with the app. Here are the key steps to accomplish this:
Adding a button or input field for user interaction:
- Choose an appropriate control, such as a button or text input, in the Canvas app design.
- Position the control in a visible and accessible area of the app interface.
Configuring the trigger action:
- Select the control you added in the previous step.
- In the Properties pane, locate the “OnSelect” or relevant event property.
- Define the action to trigger the Power Automate flow, such as using the “Run” function and specifying the flow’s name or identifier.
Testing the trigger:
- Save and publish your Canvas app.
- Navigate to the app and interact with the designated control (e.g., click the button or enter input).
- Verify that the Power Automate flow is triggered and initiated successfully.
Passing data to the Power Automate flow:
- If necessary, you can pass data from the Canvas app to the flow by using parameters.
- In the trigger action definition, specify the data to pass as parameters, such as the user’s question captured in a variable.
- Handling error scenarios:
- Implement error handling mechanisms within the Canvas app to handle any potential errors or failures when triggering the flow.
- Display meaningful error messages or provide fallback options for users to retry or seek assistance.
By effectively configuring the trigger action in your Power Apps Canvas app, you ensure that user interactions seamlessly initiate the associated Power Automate flow, allowing for a smooth and intelligent app experience.
Remember to test and validate the integration thoroughly to ensure proper functionality and user satisfaction.
By following these steps, you can successfully trigger the Power Automate flow from the Canvas app and enable the seamless transfer of data between the app and the flow, enhancing the overall user experience.
Optimize your Power Apps development by integrating ChatGPT and empowering your app with intelligent capabilities.


Pingback: Part 2-Integrating ChatGPT in Power Apps: A Comprehensive Guide - Dynamics 365 And Power Platform Insights: Azure Dynamics Unleashed
Pingback: Part 2-Integrating ChatGPT in Power Apps: A Comprehensive Guide - Dynamics 365 And Power Platform Insights: Azure Dynamics Unleashed